Tuesday, June 14, 2011

A Table Slipcover, If You Will

Ok. So the new objects of my affection (Craigslist chairs) landed in my dining room. I love my little farmhouse table. It's cute. Not a "forever" piece since it won't sit the 8-10 I would prefer but I like it. We bought the dining set along with these side tables when we moved into our current (and first "grown up") house, coming from a tiny 1 bedroom apartment. I envision this as a breakfast table in it's next life if we move to another house.
I digress, I dragged my gray/french blue-ish chairs into the dining room where they sat with 4 other white chairs and a table with a dark wood top and white legs.

Photobucket

Too many finishes in one place. My eyes were bouncing all over the room. I don't know what color to look at. Please. tame. this. space.

I threw on a white table cloth that I use for special occasions.

Photobucket

Close, but still not quite what I wanted for every day use. Think.....think...
I remembered a cute table cloth my friend, Emily, made for her daughter's birthday party table...darling....I was inspired to create.....

...I shall make my own custom fitted tablecloth! In the shabby variety...

.....with RUFFLES!

Photobucket

LOVE IT!( Please disregard the trashed out play room beyond!)

Now the chairs can shine against a neutral backdrop and my dining room gets a light and fresh makeover for the summer months.....now maybe I need to paint the room too?? The sage green is getting a little tired these days....
Photobucket

Aaaaand....the photo session is over as I was informed it was POOL TIME!

Photobucket


A Little Knick Knack


Transformation Thursday


UndertheTableandDreaming

Saturday, June 11, 2011

Craigslist Excitement!!!

I have a sneaking suspicion that, like me, you all love to peruse Craigslist, go to garage sales, and rummage thrift stores. I get downright giddy browsing Craigslist for some well-priced hidden treasure. So in the spirit of sharing....look what I scored on Craigslist!!!

Photobucket


I have a thing for ladderback chairs. LOVE them. I bought a $5 ladderback at a yard sale the other day but that's another story.

The great part about this pair is that I don't even have to paint them because they already have a wonderfully distressed, aged paint job. I have a suspicion that chalk paint and wax was used on them because of how the paint will flake if I really dig my nail into it. But they also have a beautfiul, hard sheen that looks very similar to my waxed furniture pieces.

Photobucket

Ok, so I scored these BOTH for $60. That's good, right? I don't think the person knew what they had. I thought $60 was a steal. Oh, I looooooove these details!

Photobucket

Photobucket

Tuesday, June 7, 2011

Chalk Paint Endeavor #4

I finally took the plunge to transform these side tables!

Photobucket

I know, I know....there's nothing wrong with them, right? Why would I paint these? The horror!

Disclaimer for all the wood-o-philes: these are mass produced manufactured pieces, by the way. I am not destroying Aunt Ethel's prized antiques! :)


I do love the shape and style of these tables but I bought them when we first moved into our house 4 years ago. I was 11 months pregnant with #1, and in a remarkable twist of fate they were the perfect, exact match set to a coffee table I already owned (purchased in a small little furniture store 2000 miles away in a different state, no less). In a desperate act of "I-need-side-tables-right-now-and-{crazy}-they-match-my-current-coffee-table-so-it's-meant-to-be" I bought them.

But this girl has always got to go changin' things!

Reading Shaunna's FAQs and watching her video on chalk paint and waxes gave me the final UMPH to do this. I highly recommend the video for some FYIs on chalk paint. I also re-watched Miss Mustard Seed's video on waxes. Again, very informative. Just watch them and hopefully your fears will subside enough to get you to hold your paint brush without breaking into hives. At least it helped me.

This is my 4th chalk paint endeavor. #1 & #2 were successful, #3 started to give me hives again but I did some experimenting on that one which I will share in a later post along with some chalk paint lessons learned......

but for now, let's enjoy the after!

Photobucket

Photobucket


Lighter? Brighter? The Mister is not convinced. He says the table looks a bit bipolar. Fancy on top, shabby on the bottom. Ok, I can receive that. It is quite shiny on the top but I love the wood grain pattern so I was nervous to touch it. But I may strip the top and do a wash over it to tone it down a bit....we'll see....this is a work in progress!

Linking up to

Before & After Party @ Thrifty Decor Chick

Piece of Work Wednesday at Primitive & Proper
Sunday Showcase at Under the Table and Dreaming


Transformation Thursday

Furniture Feature Fridays

The Shabby Nest


Tuesday, May 24, 2011

Tee Time

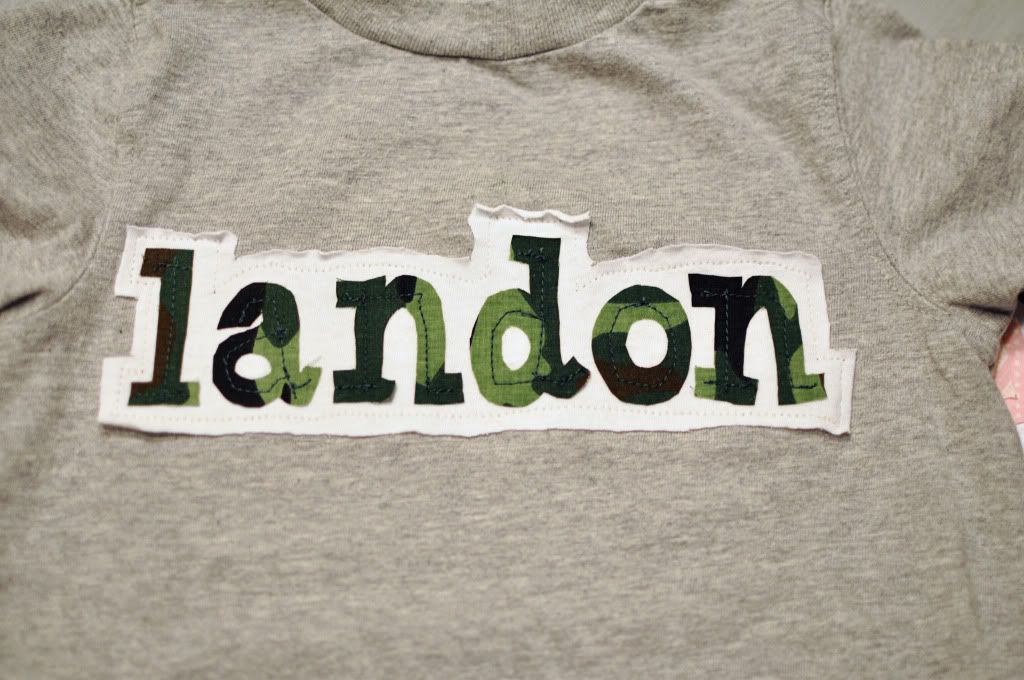
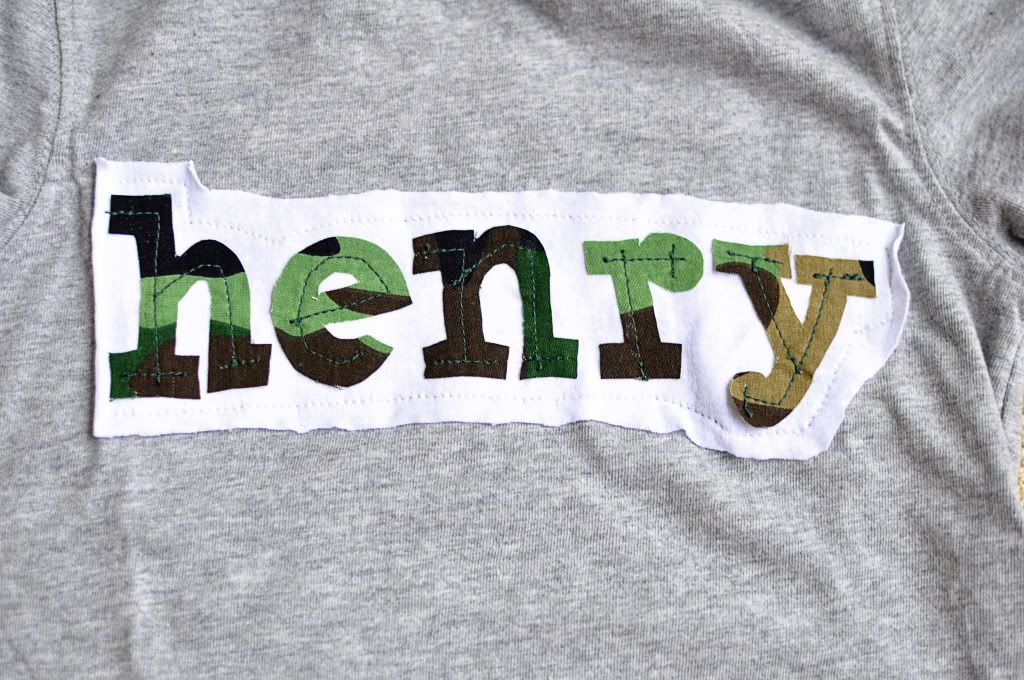
I love making personalized gifts for people. I am in a busy season of life with 2 toddlers so I don't get to do this as much as I like but my new favorite thing is making applique t-shirts.

I thought I'd do a quick tutorial even though this may be so obvious. I apologize if you start to drift off!!
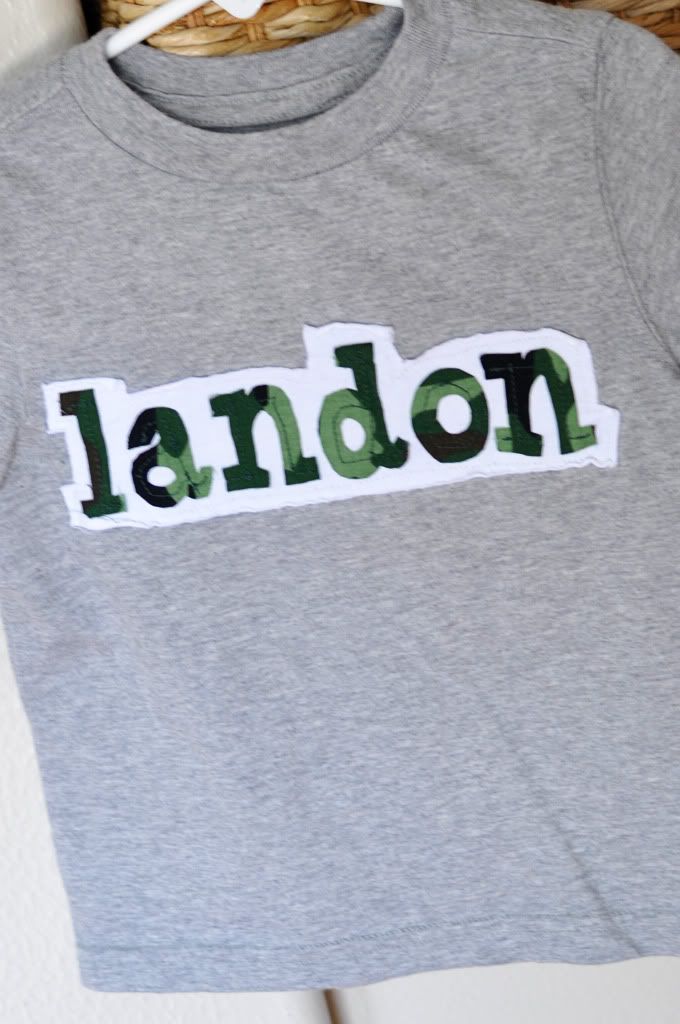
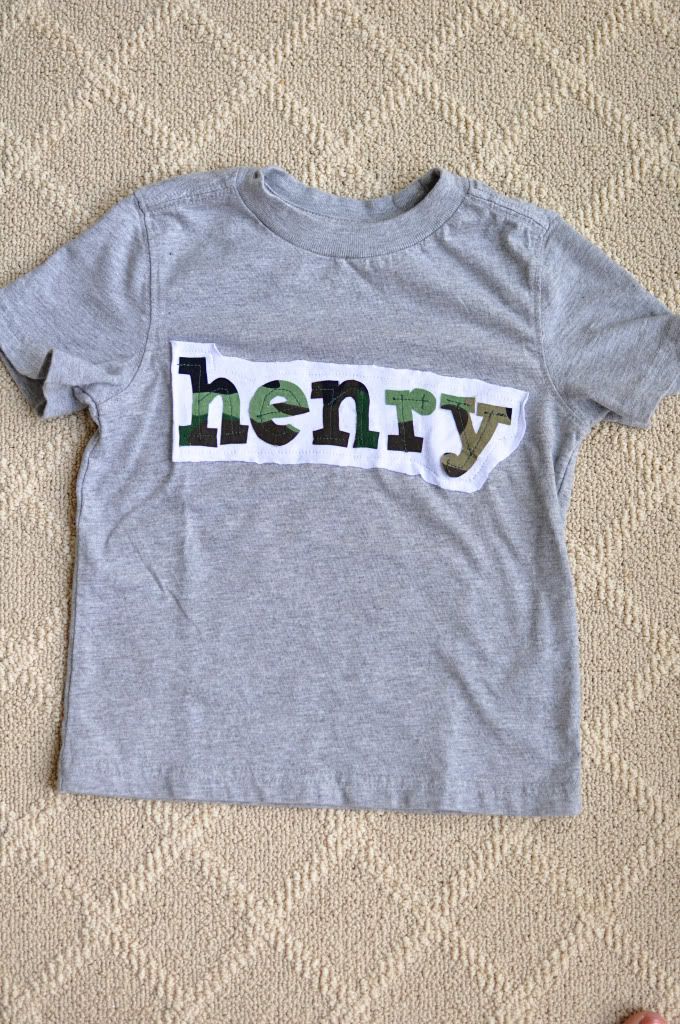
I made this one for our friend's little boy....wow...sorry for the blurry picture!
Photobucket

1. Print the letters out in Microsoft Word in a font you like, making sure it is the correct size to fit the t-shirt. I cut out each letter from the paper, pinned the paper letter on the camo fabric, and re-cut each letter from the fabric. I usually cut the fabric slightly larger than my paper letter by about 1/4". I do this only because it is easier (for me) to not cut exactly on the line of the paper letter and make so many intricate corner cuts.

2. Cut a large rectangle of white jersey t-shirt material as a "background" for the camo letters.
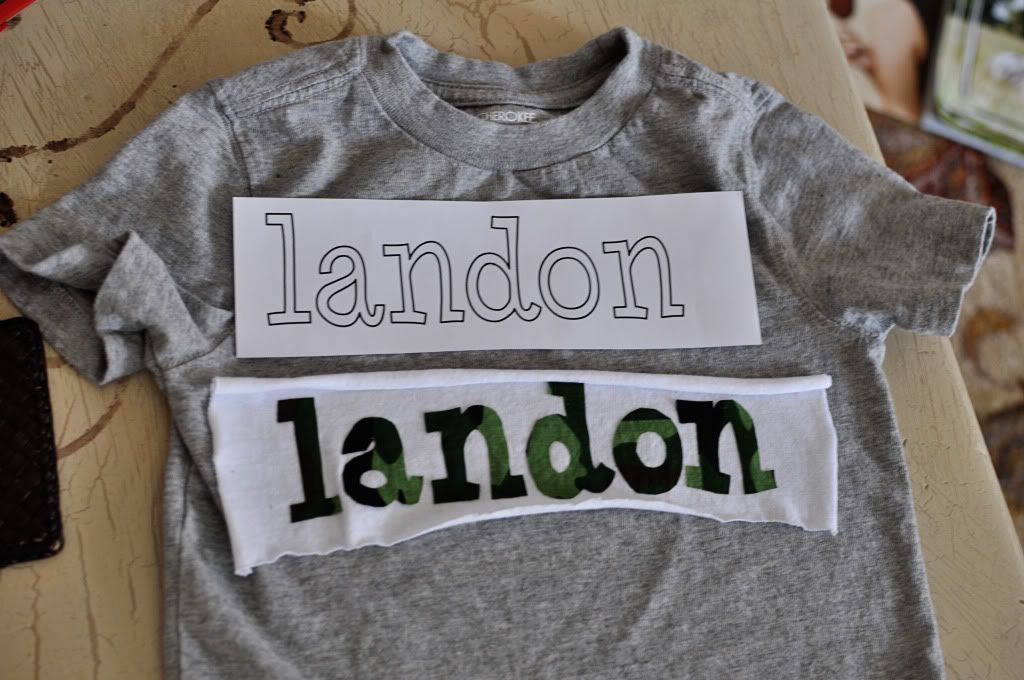
Photobucket

3. I used fusible tape or stitch witchery to adhere the camo letters to the white jersey fabric to make it easier to sew them on later. Just place a damp washcloth over the camo letters (stitch witchery between camo and white jersey) and apply a hot iron to get it to stick.

4. Now, the patience builder. I carefully and slowly stitched the letters for extra reinforcement. This takes a little practice and patience but you just stop every few stitches and turn your fabric so you can sew a line down the middle of each letter. See, if you look close, it's not perfect but it does the job. Camo letters aren't moving now.
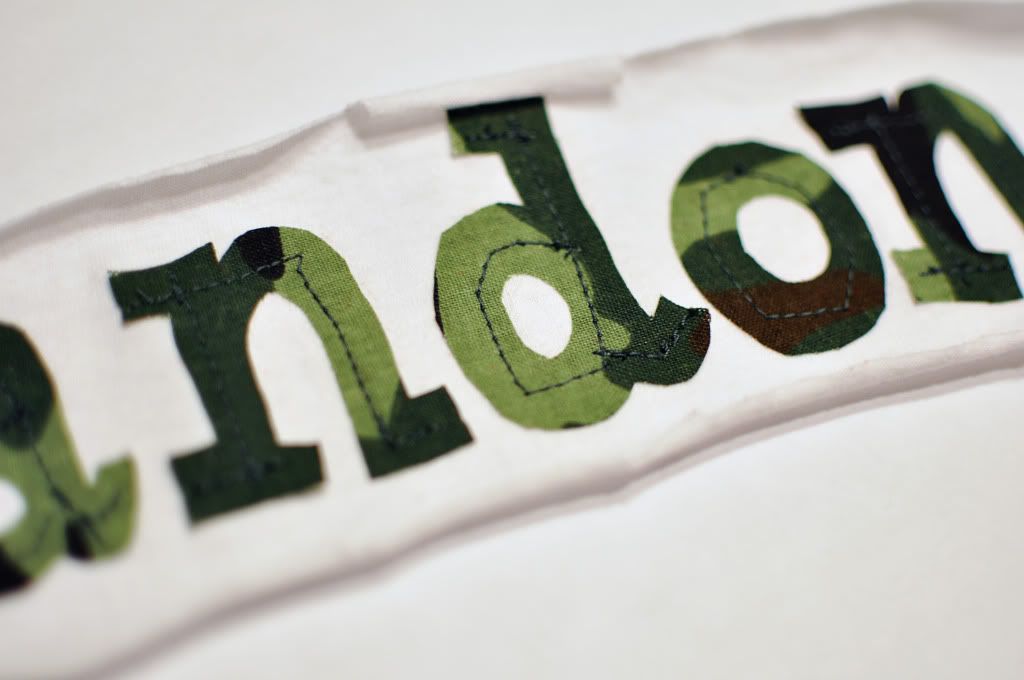
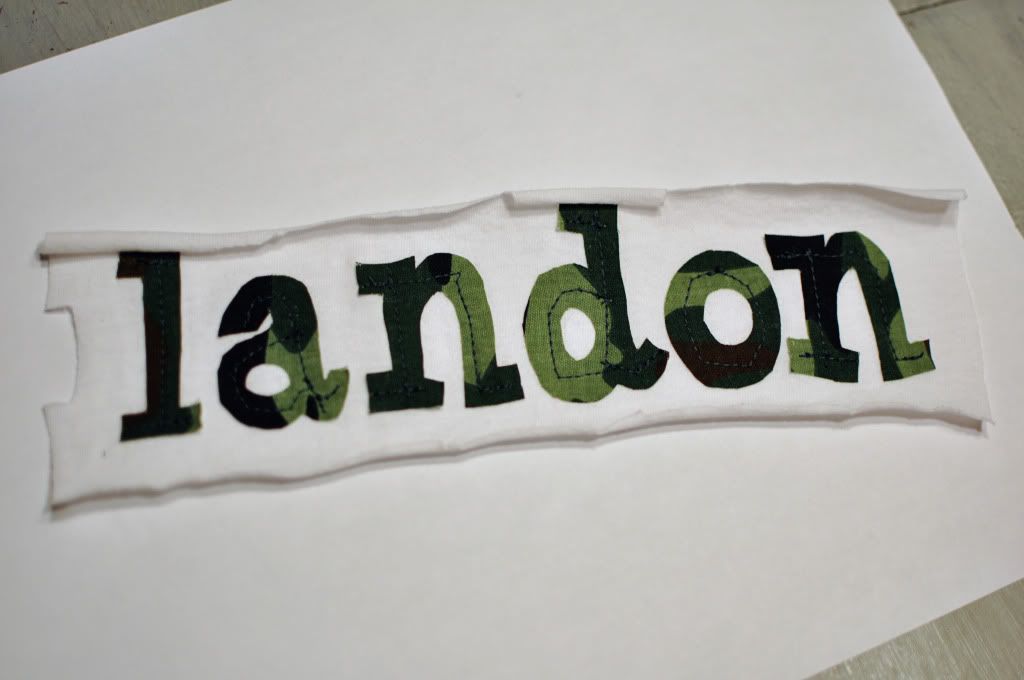
Photobucket

Photobucket


5. Attach the camo letters/white jersey piece to your t-shirt with the stitch witchery method again. (The great thing about doing it layered like this is if you get this far only to mess up, you haven't ruined the t-shirt, you just start over with the name again!---or you give up---but don't do that---remember I said it takes a little patience---you can do this!)

6. Ok, almost done. Now you do a reinforcing stitch to attach the white jersey background onto the t-shirt. Sew as close as you can around the name on the white jersey.

7. Trim off the excess around the outline stitch very carefully (preferably with small scissors) so you don't clip the main t-shirt, as I have done before....unfortunately
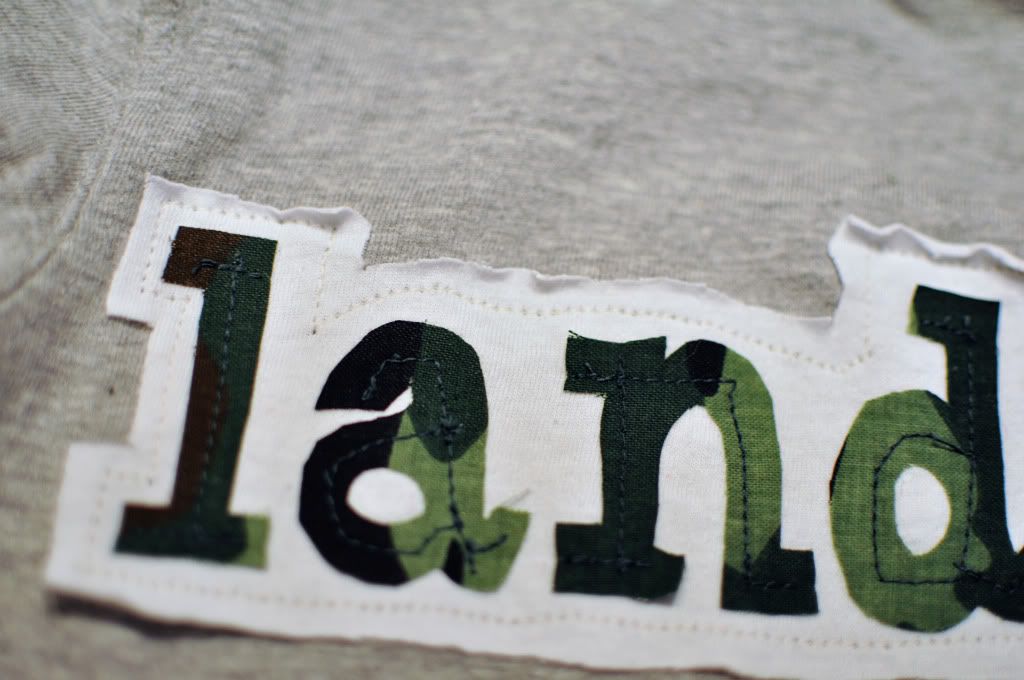
Photobucket

And here you go!
Photobucket

When you wash it, the edges of the letters will probably fray a bit but I think it adds charm and ruggedness to the look. It is a little boy's camo shirt, after all. We're going for a rugged look here. Here is another one...
Photobucket

Photobucket

The possibilities are endless with this basic concept.

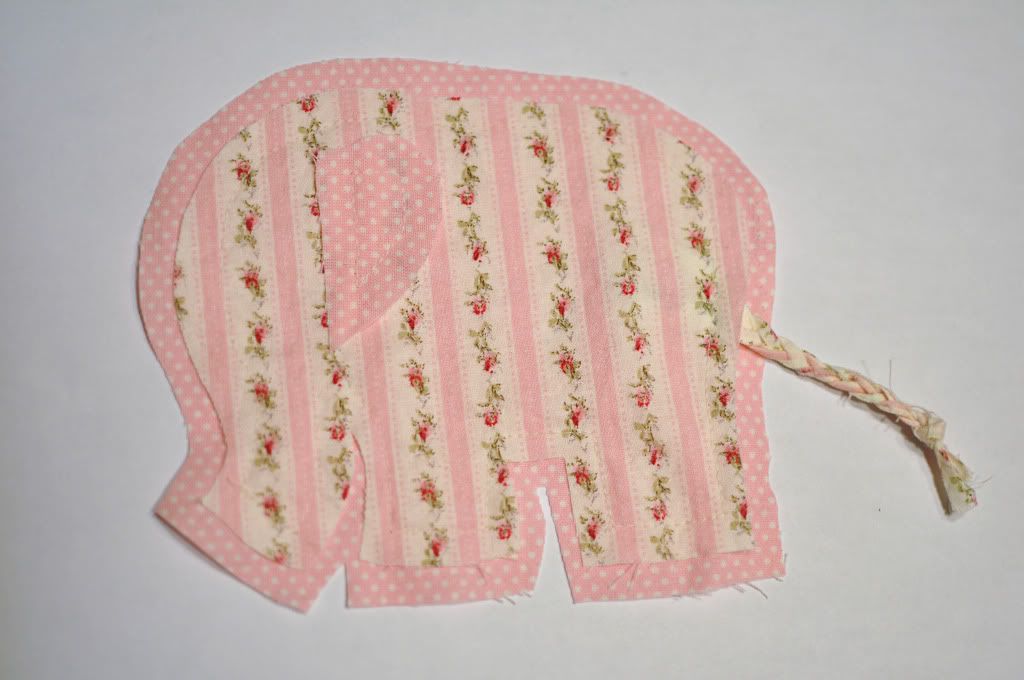
I made this one for Landon's sister....
Photobucket

It's the same concept but I wanted the edges of this elephant to really fray so I cut the elephant about 1/2" larger than the template, then snipped flaps every 1/4" without cutting through your outline stitch. This snipping method is good when you're using cotton or poplin material. It helps the edge to fray
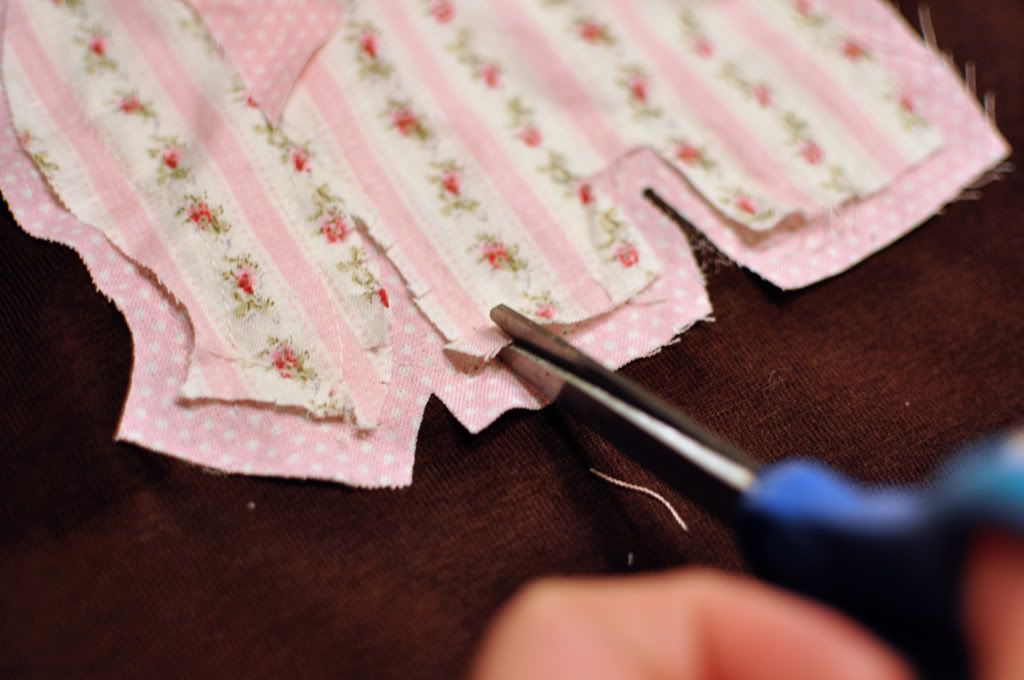
Photobucket

Then when you wash it several times it will fray up (kind of like a rag quilt, if you've ever made one of those it's similar)
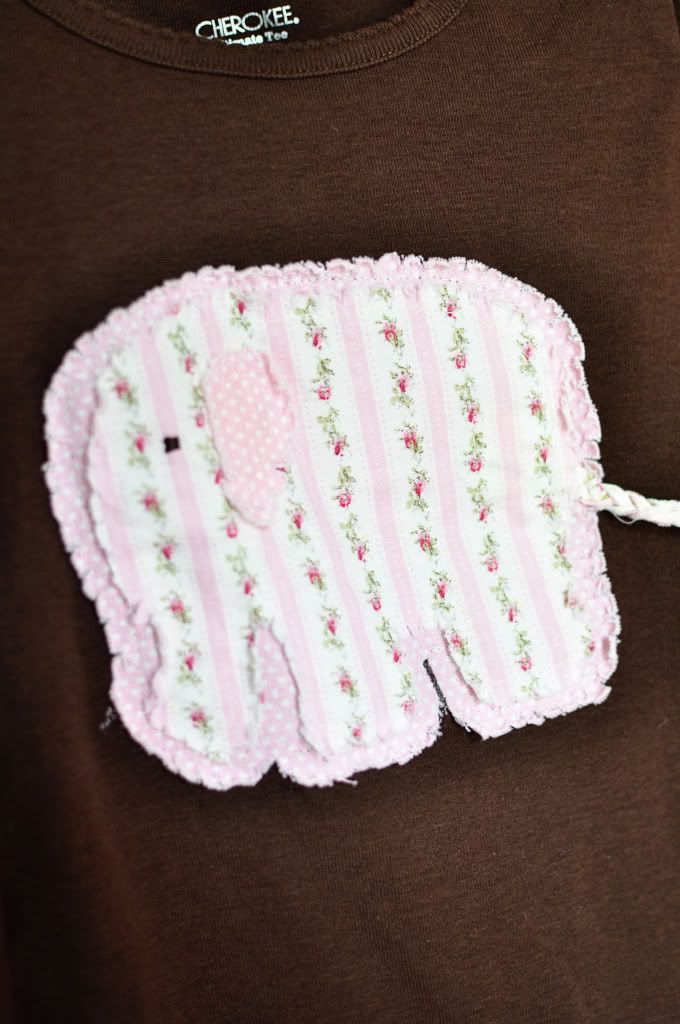
Photobucket

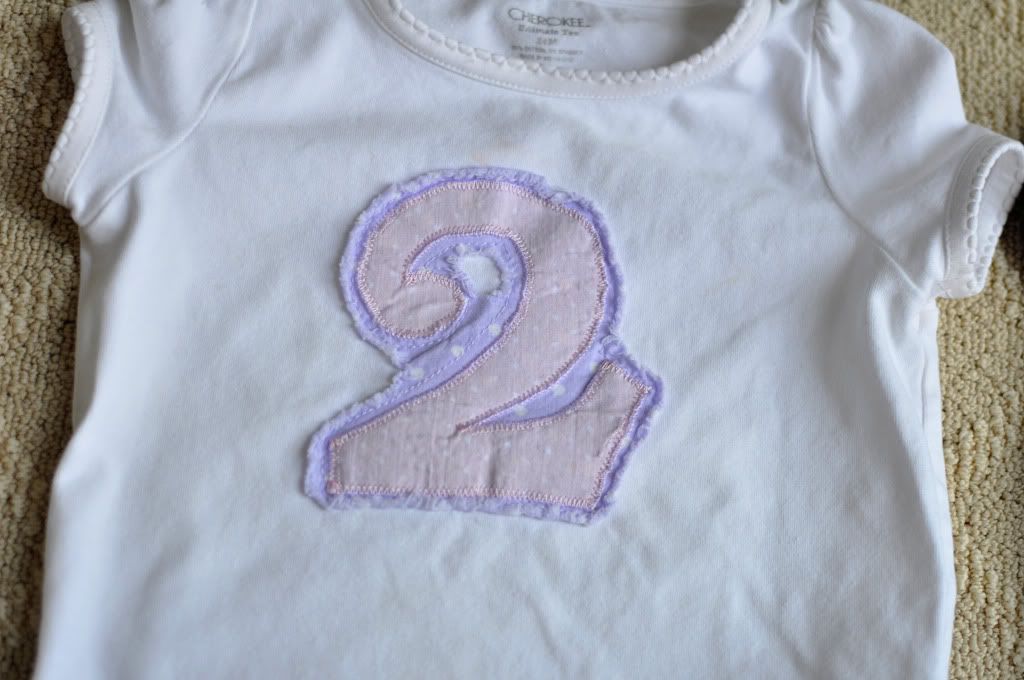
I used the same concept to make this shirt for my daughter. This one has been washed several times so it is really nice and frayed.
Photobucket

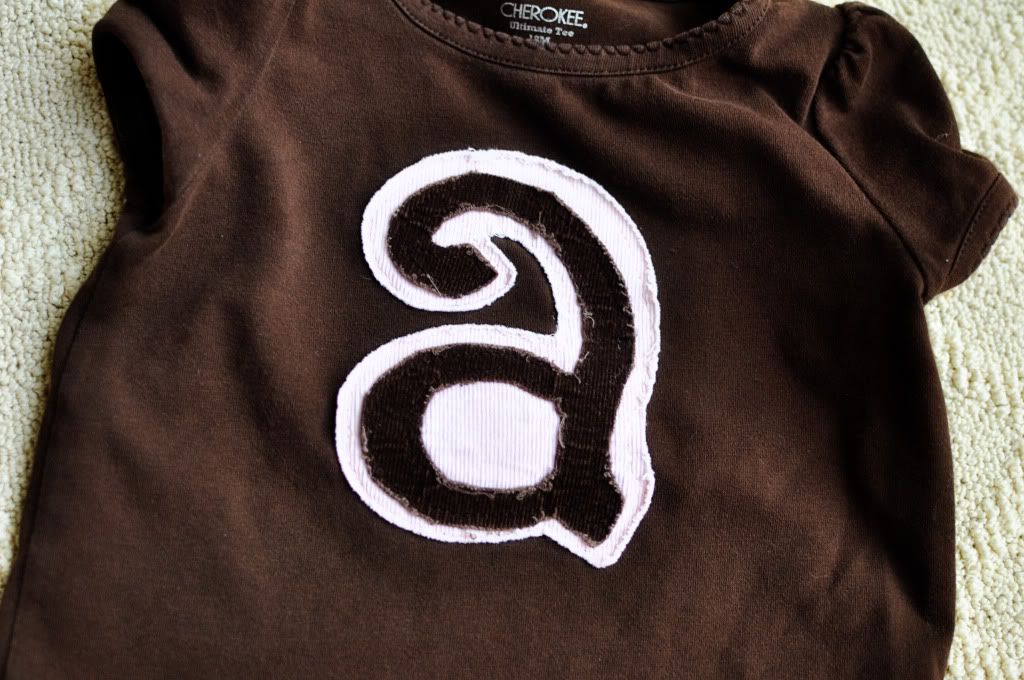
I used corduroy for this one and it frays nicely without snipping around the edges. Just a straight stitch to sew the little A to the large A first. Then another straight stitch to sew the large A to the shirt.
Photobucket

Partying at


PS - These lovely ladies featured my frenchy benchy at their linky party recaps! Thanks so much


UndertheTableandDreaming


Tuesday, May 17, 2011

For the Love of Grain Sacks

Speaking of grain sacks.....I have had a THANG for grainsacks for a while. A while ago I bought this red-striped grain sack from this seller on Etsy.com.

I had made two pillows out of it for my sofa but when I got tired of them on my sofa, I turned them into table runners.

Photobucket

Photobucket

I just love the texture. This one is a medium weight and so yummy....
Photobucket

I recently bought another sack from the same seller because I wanted an accent pillow for my son's bed.

I had planned to cut it up to make a smaller pillow but when I got it I just hated to cut it in case I wanted to use it for something else. It also has a beautiful texture but is thicker.

Photobucket

My mom had an extra king sized pillow she gave me and it fit the sack perfectly!

I just folded the ends under since the length of the sack was longer than the pillow
Photobucket

Photobucket

Now it's a nice home for my little guy's little guys...

Photobucket

I'm particularly liking the red and blue striped ones Christina has in her shop now. Makes me want to do something Fourth of July-y!

There are just so many things you can do with these things it makes my crafty brain spin!
Check out this post from Willow Decor for some good eye-candy and ideas :)
PS - I realize that post is several years old but I am still a big fan of this style!

Saturday, May 14, 2011

Frenchy Benchy

I bought this sad bench a while ago. The lady I bought it from wasn't planning to sell it until she had painted and reupholstered it. As she talked, all I heard was "red....velvet.....floral" and I knew I had to save this poor bench from certain embarassment.

Photobucket
Photobucket

It looks worse than it really is. The springs and seat part were in good shape. I knew it just needed a paint job and some foam/batting/upholstery on top. That's something easily remedied with my handy dandy staple gun.

First I gave it a coat of Valspar's Sea Salt Blue...love this color. Then I dry brushed my Annie Sloan's Old White Chalk Paint over the blue. A coat of Clear Hannant's Wax. Then a little strategic sanding (which ended up letting the weird green peek through but I rolled with it). Then a bit of Fiddes & Sons Jacobean wax. Using the waxes is a learning process but I've found I like the finish and control these waxes give you.

On to the upholstery....

I cut 1/2" high density foam and 1 layer of quilt batting to size.

Photobucket

Then staple it all down. I don't think I even bothered to staple the foam. I just stapled the batting over the foam to keep it in place.

Photobucket

Then staple the fabric down. This is the part that makes me sweat....literally. I usually staple in the middle of each side, pulling tight as I go. All that fabric pulling is a strength work out. Then staple all in between.
Photobucket

The corners can be tricky. I usually start with a staple in the corner, then start stapling to either side of that staple and work out toward the sides (does that even make sense?)

Photobucket

Stapling can drive one crazy but I was just thankful I didn't have to contort my body like I did for the french chairs. Now that was major work.

Next on to the finishing touch...the piping. Now, I was prepared to make my own piping like I did for my daughter's headboard. However, the fabric I bought was a bit thick. I don't know if you can tell from the pictures, but the weave and hand reminds me of an antique grainsack. It has a beautiful texture. I tried to make piping and it just wouldn't go through the machine. I couldn't even fit the fabric wrapped piping under the presser foot. What to do?? I cut strips of 1.25" fabric, folded it in thirds, and sewed down the middle.....

Photobucket

Then hot glued the trim strip to the edge. Not quite double welting but with the thick fabric it was the best I could think of using materials I had at home and without using that gimp stuff. Not that I'm against that...I used it on my french chairs but I didn't want to use it for this.

If I get brave I might do a stencil on the top....maybe a monogram or a simple graphic of some sort...I feel like it's begging me to do something to the fabric but I'm so nervous to touch it! What do you think? Will I ruin it?

Now....where to put my little bench??? It keeps moving to different places in the house. I just can't decide

Photobucket

Photobucket

Showing off at:


Furniture Feature Fridays

UndertheTableandDreaming