Wednesday, July 28, 2010

Featured!

Well, today I was delighted to discover that my little hutch redo was featured on The Shabby Nest's blog!


Although I have no aspirations of becoming a decor blogger like the dedicated women who blog the sites listed on the right column of my blog, I do LOVE LOVE reading these blogs for inspiration and ideas. And I am constantly amazed by all the people that share my same crazy thoughts and love for anything made with a little sweat equity.
So when these bloggers have "show and tell" days like Shabby Nest's Frugal Friday Parties sometimes I throw in my little project and hope others can be inspired, as I am by their projects. So imagine my surprise when I noticed some major traffic to the blog today and realized Wendy had picked me as one of her favorite projects!
Wheeeee!

Click here to see her feature


Sunday, July 25, 2010

Sanding and Painting and Glazing, OH MY!

So a month or so ago I declared to Kyle that I was "getting antsy and needed a project" So that sparked the new curtains which were followed by the pillow and tree canopy for John's room. Then I was perusing Craigslist furniture online (because that's what crazy me does for fun -- it's like going to a thrift store/garage sale from the comfort of my own home) when I stumbled upon this:


"Cute", I thought to myself. I don't know if you can tell but it's a little blue--in person it was a little too blue for me. But I loved the curvy lines and the detail and the CHICKEN WIRE doors and it was the perfect scale for our small dining room, only about 15" deep. I told Kyle, "I could do something FANtacular with this and it's whispering my name...listen....". It's at this point Kyle shudders as he sees the stars coming out of my eyes as I am hypnotized by yet another project. Thankfully my husband trusts my vision--I think?

So after mandating an act of Congress to get this thing transported to our house (it took about 4 days, multiple attempts, and the generous use of our friends' truck) I got to work


I get very caught up with my ideas so I failed to take note that it is July. Ever work in a garage in the summer--oh, wait! I did this to myself last year, not once but twice, did I learn? noooooo. My vision is stronger than the summer heat--I SHALL PRESS ON!

I spent a few days worth of the kid's nap times in the garage working on this thing. Man, those masks are no joke. Sweat Shop was a VERY literal term at our house this past week.

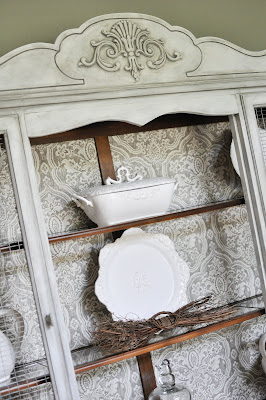
Well, to make a long story longer, the facelift included:

-Taking off the 2 middle doors because I decided there was chicken wire overdose and I wanted to see my purty things sitting in the hutch

-Sanding the blue life out of this thing

-Painting the big sucker with 2 different coats/colors of paint

-Adding a curvy wood piece to frame the top of the new open part of the hutch, thanks to my dad and his jigsaw. Thank heavens for jigsaws and dads! This made the piece brand new! thanks Daddy

-Adding an antique-y glaze to all the detail/molding parts

-Adding fabric to the back of the hutch because the wood was just too UGGG-ly to bear

And here she is now.....


Still playing with my decor options but I just couldn't wait to take pictures!


Linking to:


Photobucket


Monday, July 12, 2010

John's Room Makeover - A Tree Canopy

So the other day I mentioned (and showed off) the new curtains I made for John's room....what a difference some fabric makes! I like that with a few yards of fabric you can change the look of a room.
I also made a little burlap pillow for John's bench with an embroidered border on the letter.


My first try at that. It's fun....need to think of something else to do that on....
I also did something else to John's room. Call me crazy, I'll show you the inspiration picture first......

......because when I described this to a friend recently and said "so I hung tree branches from John's ceiling...." I don't think the mental picture was there (DEE!)....hee hee
I saw this picture one day while browsing the 'Net and mom was sitting next to me. It's 100 degrees here in Houston but I decided that I needed to do this NOW so I grabbed a saw and marched out to a conveniently dead tree in our backyard and started hacking branches off. Seriously, within 10 minutes of seeing this picture I was in action. Here is the final product in JT's room

Yes, I hid the bed rail and made John's bed for you....hope you appreciate it.
Wish I had a tree with more awesome and curly branches like the inspiration picture but this will do just fine. When you lay in his bed it looks like you're napping under a tree. So fun! At first, I was nervous that I had this fantastic idea and John would decide the branches (or worse) the shadows they cast with the nightlight were "scary". So I knew I had to sell this plan to him in a BIG way. I really talked up the project and his role in helping me. He advised on branch placement, handed me tools, and suggested star placement. He was just as excited as me and there was no mention of the branches being scary. Phew!

Saturday, July 10, 2010

Curtains for A Little Man's Room

Well, friends, I decided to make some new curtains for John's room. Yes, I had perfectly good curtains in there already but it was time for a change. The red ones were too dark and overwhelming. Especially against the dark blue wall. I was on a mission to lighten things up in there. I found this fabric at Ikea called Berit.


The pattern is khaki, dark red, navy blue, and a lighter blue--the exact colors in John's room. PERFECT!

Then I got to work--I turned the fabric so the stripe was horitzontal. I was inspired by The Nester's living room curtains. There's something pleasing and a little modern about horizontal stripes and I really like how it changes the whole feel of the fabric! (Even though it took a little extra effort to sew 2 panels together since they are only 60" wide when you turn them) Here is the final result:

ahhh, light and bright! Especially against that navy blue wall. That wall was begging for a lighter color curtain.
I made a rod pocket at the top of each panel but ended up just hanging the curtains from rings and clips. You can see in the top picture how they hang nicely in folds. I also ended up buying some cheap Ikea panels to hang behind the curtains I made for a darkening effect in the room since it gets so bright with the big window. All of us with kids know that when baby sleeps well, Mama sleeps well. That room needs to stay dark for all of our sakes!