Saturday, November 13, 2010

....And 600 Coffee Filters Later....

....I present you with this.....


I've been wanting to make one of these coffee filter wreaths I've been seeing all over BloggyLand lately. Here is The Nester's version. Hers is great but I'm really taken with the tea dyed versions...You'll remember my tea dyed muslin ribbon escapade last year?? Oh, yes, pass the tea, please.

I've also been obsessed with these coffee filter pomanders by Alice W for a loooong time.

GORGEOUS! I had already made something a little similar for Anna's room when I saw these pictures and freaked because I liked these better. Of course, at 8 months pregnant, I decided not to redo a perfectly good project but now may be the time to do these because I just luuuuuuv them. And this??

I mean, seriously, I'm just going to have to start buying coffee filters at Costco. Maybe my front door will be coffee filtered by January?

Anyways, back to the point: I finally just got off my duff and made the coffee filter wreath. Last year I really wanted to make one of these sheet music wreaths


but never got around to it....typical....that idea landed in the craft graveyard (as Kyle would call it). However, I would not be stymied this year! So I dove in....
I like how they turned out. I have one on each bookcase. I don't think the picture does it justice. I couldn't get the full effect with my 35 lens and was too lazy to switch lenses so you could see the whole wall


I estimated each wreath has about 300 coffee filters....coffee anyone? anyone?

Wednesday, July 28, 2010

Featured!

Well, today I was delighted to discover that my little hutch redo was featured on The Shabby Nest's blog!


Although I have no aspirations of becoming a decor blogger like the dedicated women who blog the sites listed on the right column of my blog, I do LOVE LOVE reading these blogs for inspiration and ideas. And I am constantly amazed by all the people that share my same crazy thoughts and love for anything made with a little sweat equity.
So when these bloggers have "show and tell" days like Shabby Nest's Frugal Friday Parties sometimes I throw in my little project and hope others can be inspired, as I am by their projects. So imagine my surprise when I noticed some major traffic to the blog today and realized Wendy had picked me as one of her favorite projects!
Wheeeee!

Click here to see her feature


Sunday, July 25, 2010

Sanding and Painting and Glazing, OH MY!

So a month or so ago I declared to Kyle that I was "getting antsy and needed a project" So that sparked the new curtains which were followed by the pillow and tree canopy for John's room. Then I was perusing Craigslist furniture online (because that's what crazy me does for fun -- it's like going to a thrift store/garage sale from the comfort of my own home) when I stumbled upon this:


"Cute", I thought to myself. I don't know if you can tell but it's a little blue--in person it was a little too blue for me. But I loved the curvy lines and the detail and the CHICKEN WIRE doors and it was the perfect scale for our small dining room, only about 15" deep. I told Kyle, "I could do something FANtacular with this and it's whispering my name...listen....". It's at this point Kyle shudders as he sees the stars coming out of my eyes as I am hypnotized by yet another project. Thankfully my husband trusts my vision--I think?

So after mandating an act of Congress to get this thing transported to our house (it took about 4 days, multiple attempts, and the generous use of our friends' truck) I got to work


I get very caught up with my ideas so I failed to take note that it is July. Ever work in a garage in the summer--oh, wait! I did this to myself last year, not once but twice, did I learn? noooooo. My vision is stronger than the summer heat--I SHALL PRESS ON!

I spent a few days worth of the kid's nap times in the garage working on this thing. Man, those masks are no joke. Sweat Shop was a VERY literal term at our house this past week.

Well, to make a long story longer, the facelift included:

-Taking off the 2 middle doors because I decided there was chicken wire overdose and I wanted to see my purty things sitting in the hutch

-Sanding the blue life out of this thing

-Painting the big sucker with 2 different coats/colors of paint

-Adding a curvy wood piece to frame the top of the new open part of the hutch, thanks to my dad and his jigsaw. Thank heavens for jigsaws and dads! This made the piece brand new! thanks Daddy

-Adding an antique-y glaze to all the detail/molding parts

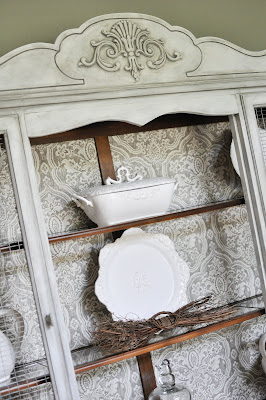
-Adding fabric to the back of the hutch because the wood was just too UGGG-ly to bear

And here she is now.....


Still playing with my decor options but I just couldn't wait to take pictures!


Linking to:


Photobucket


Monday, July 12, 2010

John's Room Makeover - A Tree Canopy

So the other day I mentioned (and showed off) the new curtains I made for John's room....what a difference some fabric makes! I like that with a few yards of fabric you can change the look of a room.
I also made a little burlap pillow for John's bench with an embroidered border on the letter.


My first try at that. It's fun....need to think of something else to do that on....
I also did something else to John's room. Call me crazy, I'll show you the inspiration picture first......

......because when I described this to a friend recently and said "so I hung tree branches from John's ceiling...." I don't think the mental picture was there (DEE!)....hee hee
I saw this picture one day while browsing the 'Net and mom was sitting next to me. It's 100 degrees here in Houston but I decided that I needed to do this NOW so I grabbed a saw and marched out to a conveniently dead tree in our backyard and started hacking branches off. Seriously, within 10 minutes of seeing this picture I was in action. Here is the final product in JT's room

Yes, I hid the bed rail and made John's bed for you....hope you appreciate it.
Wish I had a tree with more awesome and curly branches like the inspiration picture but this will do just fine. When you lay in his bed it looks like you're napping under a tree. So fun! At first, I was nervous that I had this fantastic idea and John would decide the branches (or worse) the shadows they cast with the nightlight were "scary". So I knew I had to sell this plan to him in a BIG way. I really talked up the project and his role in helping me. He advised on branch placement, handed me tools, and suggested star placement. He was just as excited as me and there was no mention of the branches being scary. Phew!

Saturday, July 10, 2010

Curtains for A Little Man's Room

Well, friends, I decided to make some new curtains for John's room. Yes, I had perfectly good curtains in there already but it was time for a change. The red ones were too dark and overwhelming. Especially against the dark blue wall. I was on a mission to lighten things up in there. I found this fabric at Ikea called Berit.


The pattern is khaki, dark red, navy blue, and a lighter blue--the exact colors in John's room. PERFECT!

Then I got to work--I turned the fabric so the stripe was horitzontal. I was inspired by The Nester's living room curtains. There's something pleasing and a little modern about horizontal stripes and I really like how it changes the whole feel of the fabric! (Even though it took a little extra effort to sew 2 panels together since they are only 60" wide when you turn them) Here is the final result:

ahhh, light and bright! Especially against that navy blue wall. That wall was begging for a lighter color curtain.
I made a rod pocket at the top of each panel but ended up just hanging the curtains from rings and clips. You can see in the top picture how they hang nicely in folds. I also ended up buying some cheap Ikea panels to hang behind the curtains I made for a darkening effect in the room since it gets so bright with the big window. All of us with kids know that when baby sleeps well, Mama sleeps well. That room needs to stay dark for all of our sakes!

Tuesday, March 30, 2010

Goodwill Scavenging: A Lonely Table Meets Her Destiny

Here is my latest Goodwill find.


A $20 table that had nice lines but a weird medium wood finish and more scratches than was acceptable. As I mentioned in a previous post, I have a strange addiction to tables. I find them everywhere. Or should I say: they find me.

Well, I realized in January that I should've put an electric sander on my Christmas list. When I got this table I decided to take the plunge and bought myself an early Mother's Day gift.

Nice, huh? Who ever said women don't appreciate power tools for special occassions hasn't met me.
I had been looking for a fairly small piece to try out a new painting technique I learned here called dry brushing. This table was the perfect guinea pig. I am luuuving this technique. I want to do it to everything. I am cautiously eyeing things in my house that are thisclose to being hit with my new-toy-the-electric-sander. Look out, furniture!

Because this piece is so small I actually did this project in about 2-3 hours. 45 minutes to sand, the rest to dry brush 2 coats including drying time in between. And I use the term "drying time" loosely. I waited about 45 minutes after the first coat because I can't wait for paint to dry! I want to see the finished product yesterday!
And here she is after her makeover.

I think the pictures don't do it justice because it was so bright outside that you can't see the paint technique very well but I am pleased as punch with the outcome. And she looks just right sitting in the hallway, under all our family pictures. Loverly......

Saturday, February 13, 2010

Nasty Bookshelves - RIP

Another reason for me being scarce these past few weeks is that the house has been turned on it's head for the past 3 weeks. It's dRiVIng mE cRAzy! I can't stand the disorderliness (is that a word?)

It all started with the decision to finally get a TV mounted over the fireplace. You'd think that would be no big deal but you would think wrong. These are the bookshelves before (the fireplace in the middle is cropped out of this picture)

So you see...when we remove the TV from the current location we're left with a huge, ugly, gaping hole that really can't masquerade as a decorative shelf or anything else. The only solution was to redo the bookshelves on either side. So this was a major undertaking.

After three days of banging, demolition, drilling, pneumatic nail gunning, sawing, dust, paint fumes, a freezing house (since windows were wide open lest we suffocate), and sparse naps for the wee ones while all this was taking place, it is all DONE. And now we have respectable-looking bookshelves and cabinets. Praise the Lord forevermore.

Here are the new bookshelves....

But, wait...ugh! too plain! too white! hmmm....

since I can't leave well enough alone I must add my little touch to them....I must gLorify them. I took a deep breath and declared to Kyle: I have a plan and I'm going to glaze the cabinets....and I'm gonna do it TONIGHT and no one will stop me.

So last night after 3 hours and a tremendous buzz from paint thinner fumes that almost prohibited me from sleeping I had this:

I am quite sure I lost more than a few brain cells from those rags dipped in paint thinner BUT those wonderfully antiqued little crevices are so worth it. Is it OK to love a good glaze job? Oh, Glazed Cabinets, will you be my Valentine?

A kind message to the ugly black stone fireplace surround: Watch your back....I've got you in my sights and your days are numbered now. The only thing standing between me and a nice-looking wall is you and your ugly face.

Saturday, February 6, 2010

Canton and Other News

Oh, it's been quiet on the blog here but don't let that fool you....it hasn't been so quiet in real life.

Last weekend I went on a girls trip with my pals, Emily and Kim. This was my first ever girls only trip since having kids and, boy, was I hot to trot! Kyle kept John while my mom kept Anna. On Friday the girls and I headed out for First Monday Trade Days in Canton, TX. Pretty much Trade Days is a once-a-month gathering of vendors selling wares for home, kids, garden, furniture (anything you could imagine). Think Nutcracker Market but BIGGER! We were in heaven.

Unfortunately for us we underestimated the weather report. 40 degrees and sunny seemed manageable with a heavy sweater and boots. But as we were getting ready on Saturday morning the news reported that the temps with wind chill were more like 17--oh, and it was cloudy drizzly. We even saw a few light snow flakes. Yeah, the sweaters weren't cutting it so we hightailed it Wal-Mart to buy jackets and gloves and as we arrived on the Trade Day grounds we noticed almost every single woman wearing those wool knitted headbands with a knitted flower on them. You guessed it, we all bought one too. It was the uniform that weekend. Sooooo bitterly cold! But worth the precious company and conversation that moms don't usually get to have when wrangling toddlers...

So blame it on the weather or the lack of sleep from rearranging items in my house, I got terribly sick last Wednesday with a fever of 103.7. Not good. I had flashbacks of Kyle's spell from pneumonia that had him down for 3 weeks and was a bit worried. Thankfully I bounced back in a few days.

In other news, the kids are great. Anna is crawling and cruising. I'm just waiting for her to start taking some steps although, in reality, I really can wait for that. She's got a spunky little personality but thankfully, after two straight months of ear infections, we haven't had any more issues. The ear infections were turning her spunky into just plain funky. The little lady was quite a screamer for that time period.

OK, gotta run...I promised John I'd play some puzzles with him and he is presently trying to body-slam Anna!


Thursday, January 21, 2010

The Craft Machine Keeps on Whirring....

After my proclamation of taking a break I decided to hit the sewing machine again (no surprise here). It's like crack, I tell you! If a loaded sewing machine and pretty fabric are within arm's length, I just. can't. help. MYSELF!

So back to the project at hand: Our back door has always bothered me because it has a HUGE window pane and I always feel very exposed at night--especially if my man is gone and I'm home alone. As you can see, any ol' bad guy could just come up to the window and see what I'm doing here.

BOOOORING
So after seeing this post from Thrifty Decor Chick and realizing that I can use MAGNETIC RODS to hang a window covering on a metal external door, my whole life changed....magnetic rods...oh my word! I didn't even know such a thing existed!


After this epiphany I finally had the courage to proceed with my whole master plan for the breakfast room....
BEFORE

AFTER


"PINCH PLEAT WINDOW VALANCES!!!", she exclaimed madly

Don't be afraid of pinch pleat! This was so easy! So these are just long rectangular panels. A little measuring involved to make sure your final length (after you fold up your pleats) comes out right. I sewed on some black grosgrain ribbon as a trim. Here is a view of the pleat from the front. (Obviously, not a professinal job here but good enough for li'l ol' me)

 Here is a view from the back. Once I pinched up the folds I did a quick stitch to hold them together.
Then I put those drapery hooks in the top and hung them on cheapy aluminum window valance rods. (You can see the type of rod in the picture above next to the one completed valance) Since the window valance hangs on the rod with the hooks you don't even see the rod. This seemed more economical than buying 4 nice rods for each window. I like how clean it looks.

Thursday, January 14, 2010

Camila's Room

So here's the other reason December/early January has had me a teeny bit busy


Camila's room!

Here's the story:

The little girl who lives down the street has a full time nannny named Mary. Mary and I have developed a special friendship over the past 2 years. We share impromptu playdates sometimes when it's rainy or cold outside or if her and Gabriella happen to be walking by our house.
(Side note: You'll remember Gabriella was the recipient of the famed Nap Mat Project.)
Mary is close to my age and we have lots of things to talk about. She has always loved Anna's room and asked me if I would help her decorate her nursery when it came time for her to have a baby. Well, she is expecting a little baby girl at the end of the month and several months ago she commissioned me to make some crib bumpers, crib skirt, window curtains, basket liners, and a few other small crafty things for the nursery. I also helped pick out the paint color which is a nice muted, soft green. It's hard to tell in the pictures but it looks very sweet and light and girly.
I was excited to help and have finally finished it and went to her house to put everything in place.
I went out on a limb and tried this applique letter on the minky cream fabric. My first time to do it and I'm glad I didn't screw it up. I'm going to have to applique more things now! Seriously, the night I did this I actually couldn't sleep. My mind was so revved up thinking about all the things I could possibly applique...onesies, lampshades, pillows, OH MY! That's how sick I am! SICK, I tell ya!
She brought me a hand-me-down lamp whose base was speckled blue and had a weird lace-ish lampshade. I spray painted that sucker, slapped some of our leftover pink and white dot fabric to cover the shade, and added some fuzzy trim for some extra razzle dazzle and we have a whole new lamp! (that matches our scheme, thank you )
Bought these letters at the HobLob--50% off--holla! Spray painted and added the ivory dots to match the fabric on the crib bedding. This was my gift to Mary at her baby shower. She had wanted some letters for the baby room but we hadn't really pursued anything because I had this idea in mind....
The last minute project I did for Anna actually turned out to be a hit with several people who have asked me to make them for their girls...

Not sure why this picture keeps coming in sideways but it's a bow holder...

Phew! As quickly as I went into business I am retiring....at least until the kids are in school and I have waaaayyyy more time to devote to projects like this. Since I can only work during nap times (when they coincide) and in the evenings it has taken me fooorrrrevah to get this thing done.

But the most thanks goes to my amazing man who is very supportive of my crazy crafting hours. He corrals the kids and fends for himself when it's dinner time and I've completely neglected my family because I'm so into the work that I forget there's people that might need to eat a meal even if I'm blazing through. This project gave me a great appreciation for all those stay at home moms who, on top of their home-managing duties, manage to have a business selling hand-made goods on etsy or ebay or just moms who work anywhere really. Managing the house and kids is a full time job in itself and doing that and another job is super-hero status.

OK, excuse me while I go sit on the couch and EXHALE.......